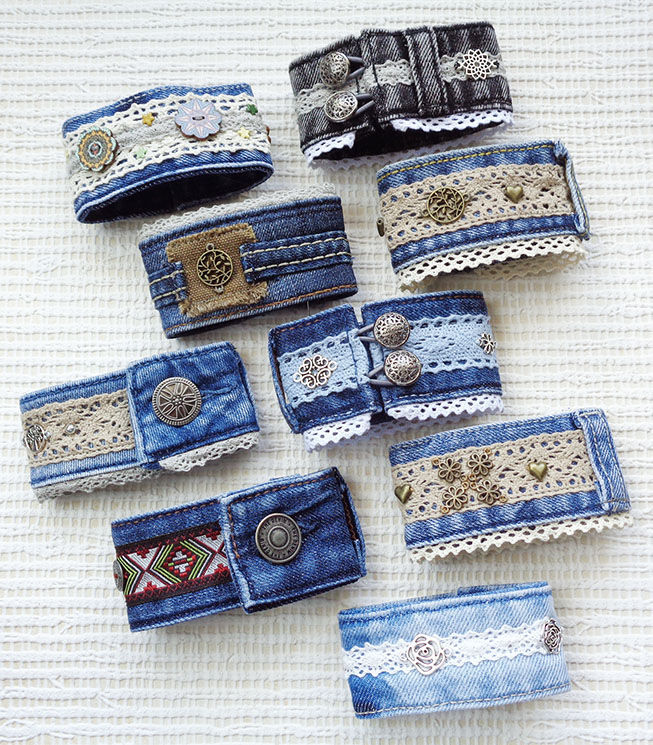
Denim cuff bracelet DIY
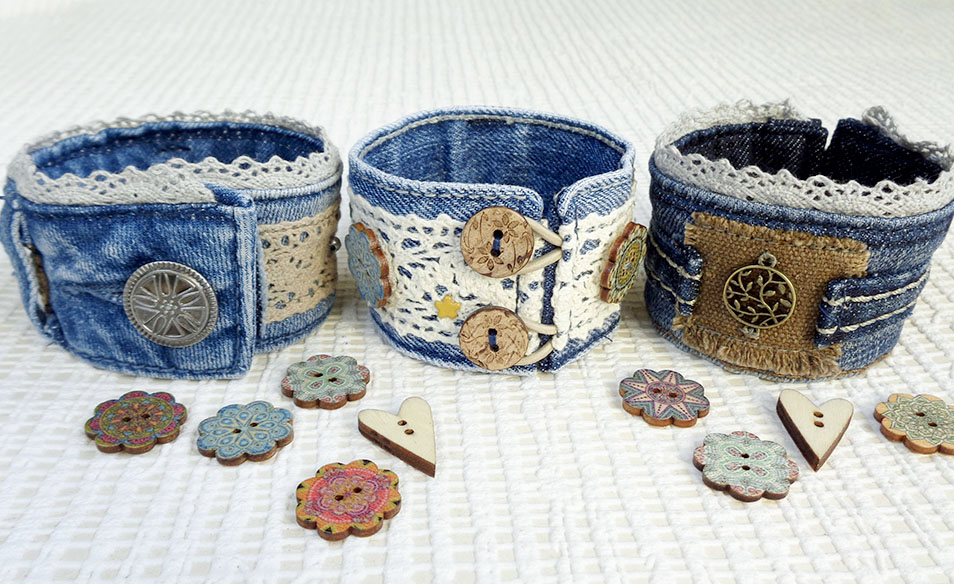
Denim and lace are so adorable together especially if you (like me) are fond of Shabby Chic and Boho style. Let’s make a denim cuff bracelet. Nice little DIY project to upcycle some parts of old jeans. Makes a great summer accessory and a lovely handmade gift. More gift ideas to make are here >>>
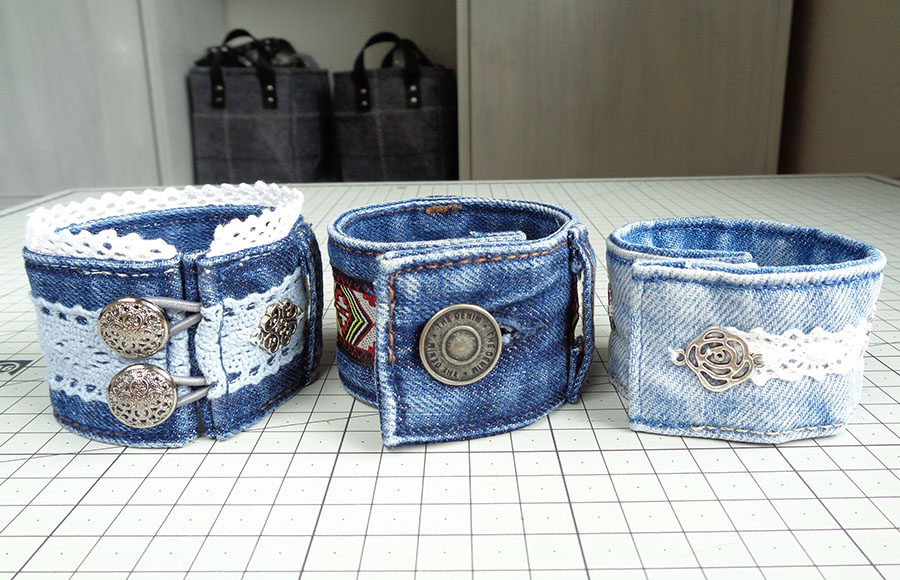
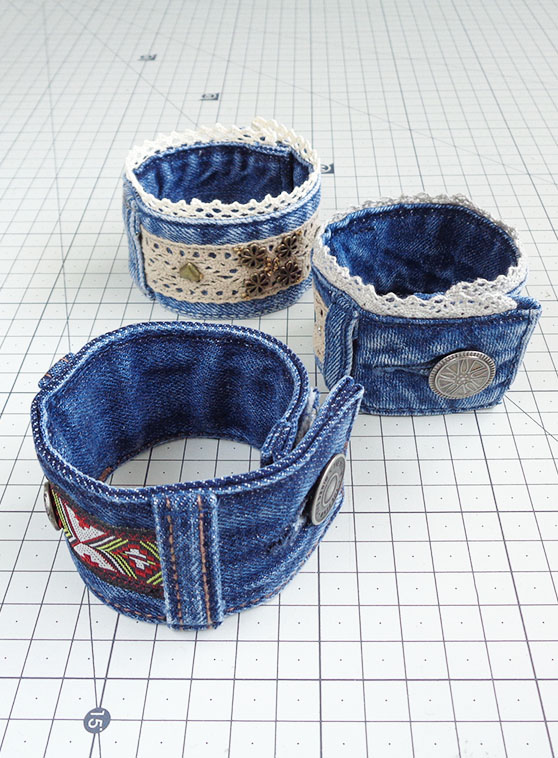
There are three types of bracelet fastening are possible to make. In this free tutorial I will describe all three. I personally prefer the first option – two buttons and elastic loops, because the bracelet then stays straight and does not swivel, as with one jeans button. But you might prefer to use the original jeans button and button hole as a design element and so you will also find the instructions below. Talking about the third option with hidden clasps – I am not sure if I like how much bulk is has on the ends and how it sticks out once overlapped.
The denim fabric should not be too thick, as it will make it very difficult to sew through all the layers. And, in general, I must mention, that this sewing project is for patient and capable fingers only 🙂 The bracelet is small and some parts are quite fiddly. Also your sewing machine should be able to handle denim.
Sewing through tough places you should go slow and rotate the machine wheel by hand. And sometimes you might prefer to do it by hand and use a thimble.
Preparations
You would need a piece of jeans waist band (max 25-30cm); some décor such as lace, ribbons, beads, pendants. What you’ll need for for fasteners depends on your choice. I will use two buttons (15mm in diameter, they can be flat or with a cap) and some elastic to make the loops for fastening (max 15cm) for my favourite option. For the option with button hole you’d need a nice jeans button cut out including surrounding denim. It can be from another pair of jeans. And for the overlapped bracelet option you’d need two metal sew-on snaps.
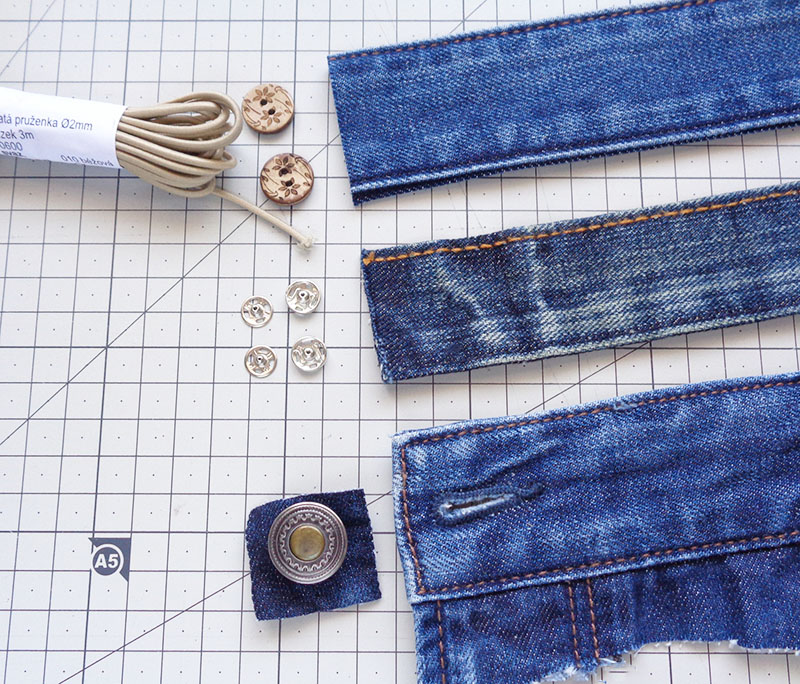
It is better if you can obtain a straight (not curved) piece of waist band and for the original button hole option – cut a piece with the button hole on it’s end.
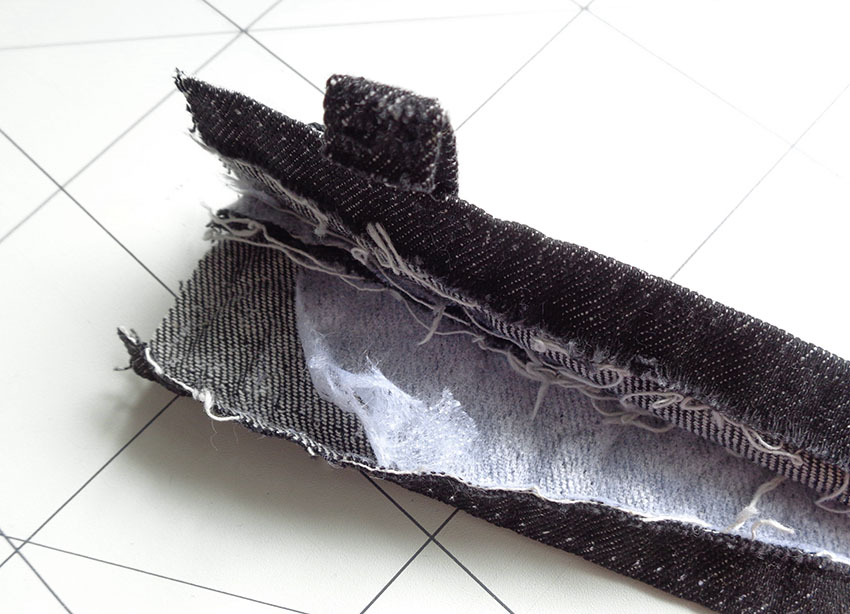
To remove waistband, try this trick. Break some stitches from the inside and then pull the inner thread. It usually, in most jeans, comes off easily. Then pull the outer thread and voila!

The easy way to remove the waist band from old jeans is in the video below. You will not need the whole waist band, only 25-30cm max. If it doesn’t work as on the video, don’t think there is something wrong you are doing! Try from another end. Still not working? That is probably because the stitches on that pair of jeans is made in a different way, this also can be the case with some jeans. So be patient and break the stitches with a seam ripper.
To make your denim band less thick, you might remove the stiffener inside, if it is there.
Belt loops
Belt loops on the waist band are quite pretty and can be used as a décor element, but they are hard work too. Be aware that the jeans loops together with the waist band might be too tough and not every sewing machine will go through it. So if you are not sure, remove or don’t include the belt loops.
Here is another video – how to remove belt loops easy and carefully:
Measuring for your cuff bracelet
For the bracelet with two buttons and loops, you can measure your wrist and add 3cm to that and then add 2-3cm again for seam allowances (5-6cm in total). Or you can wrap the band around your wrist, mark how you need it and then add seam allowances.
For the other two options (overlapped bracelets) you’d need to wrap the band around your wrist, overlap and see/mark how long the bracelet should be. Cut adding seam allowances at the ends, where appropriate.
Seam allowances should be worked out by folding the denim and seeing how much it takes to have a comfortable fold. The thickness of denim also eats up a bit. When I make these bracelets my seam allowances at the ends are appx 1,5 cm.
Main procedure
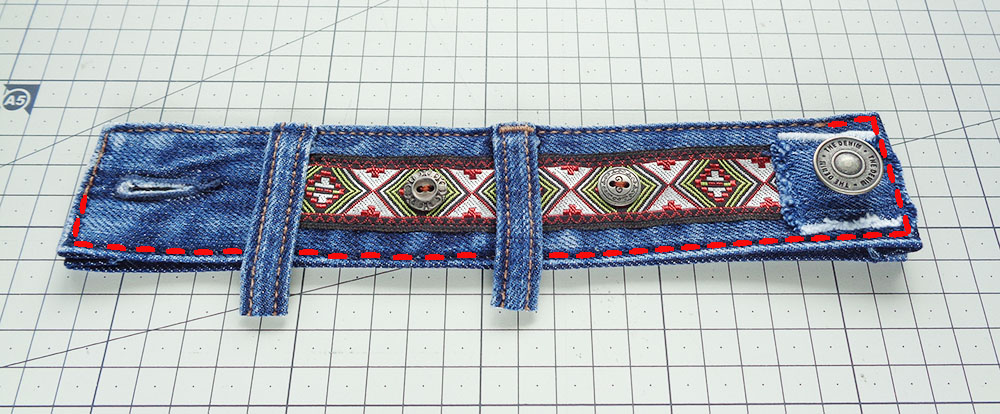
I will first show in detail how to make the bracelet with two buttons and elastic loops. This is my favourite, as I have mentioned above, and it is the best fit. For the other two options I will talk later on, briefly, to cover the differences.
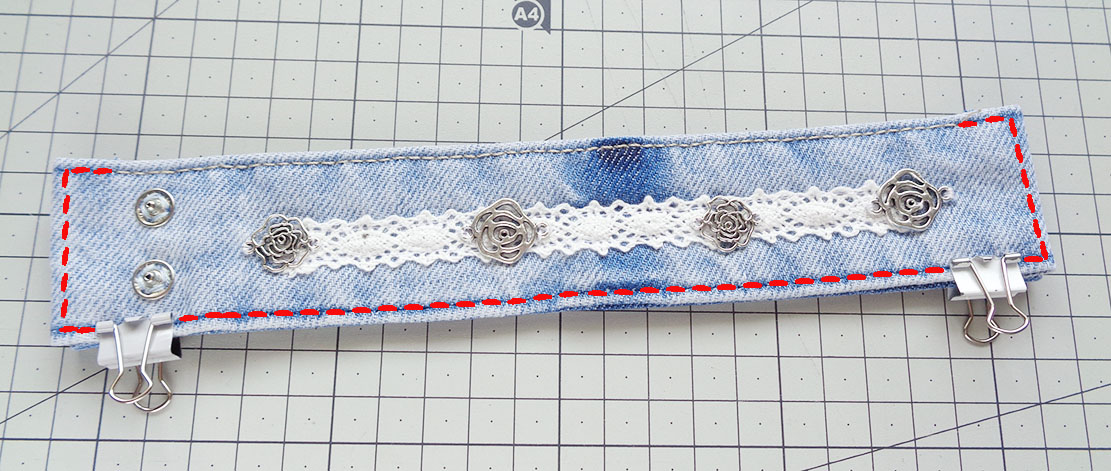
Now that you have a piece of the exact length, let’s start decorating. You can add lace, beads, fabric scraps, anything you think looks good.
If you adding some lace, sew it on to the front side only.
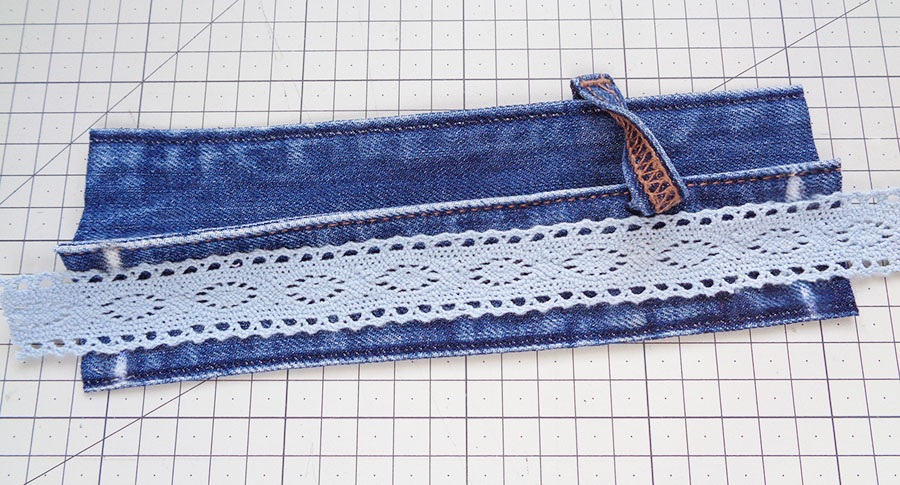
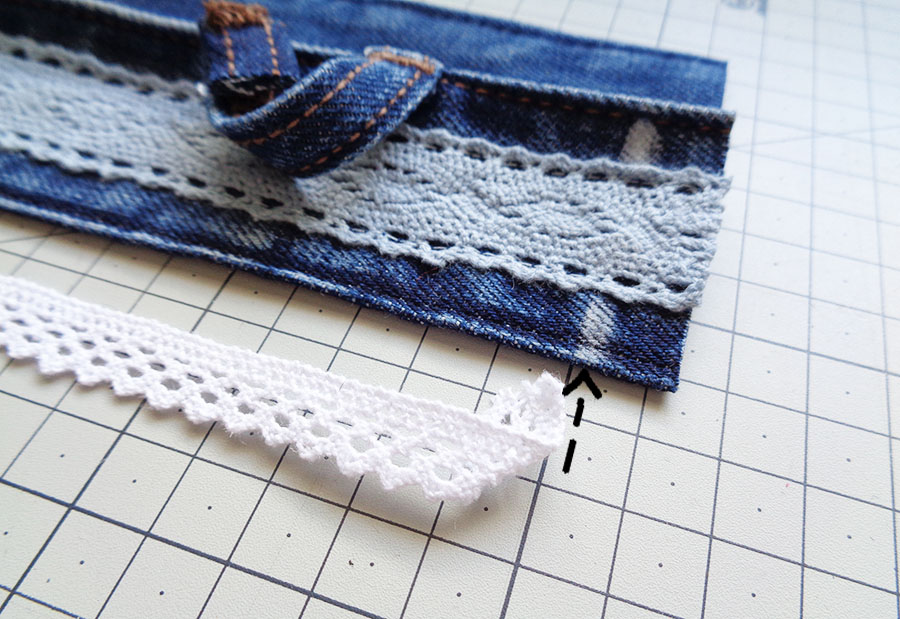
If you would like to add some lace at the bottom, so that it sticks out a little bit adding more of a Boho feel, it’s time do it now. Fold the lace end inwards and lay it underneath the edge of denim band. Level up this lace fold with the seam allowance mark. Start stitching along and, as you get to the other end, fold inwards the other end of lace so that it matches the other mark. Keep the folds within the marked area just to avoid extra bulk later when folding seam allowances at the sides.
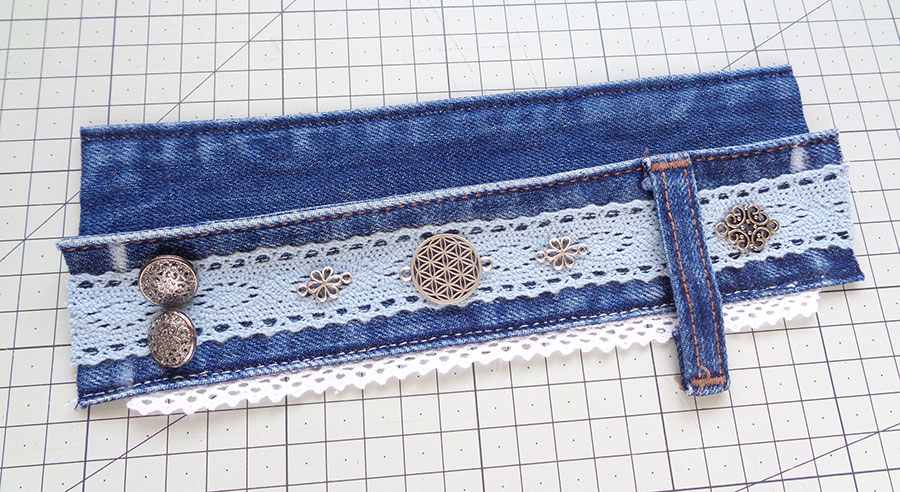
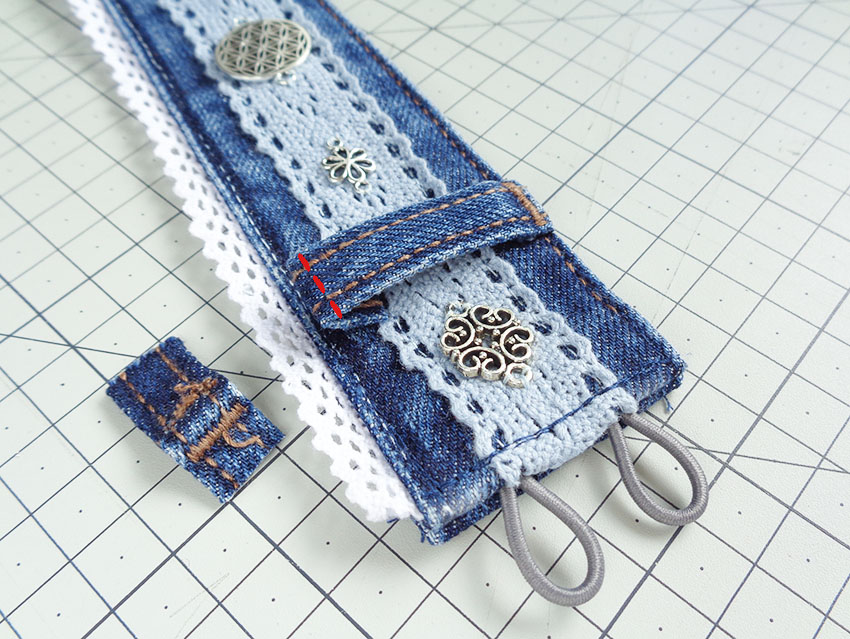
Lay the other design elements on to the denim cuff bracelet to decide what goes where. Don’t forget the space for the fastening buttons too. I recommend to place buttons at your left side, this will make it easier for handling later. Sew the design elements onto the front only – to avoid messy look at the back. Do not sew on the fastening buttons for now.
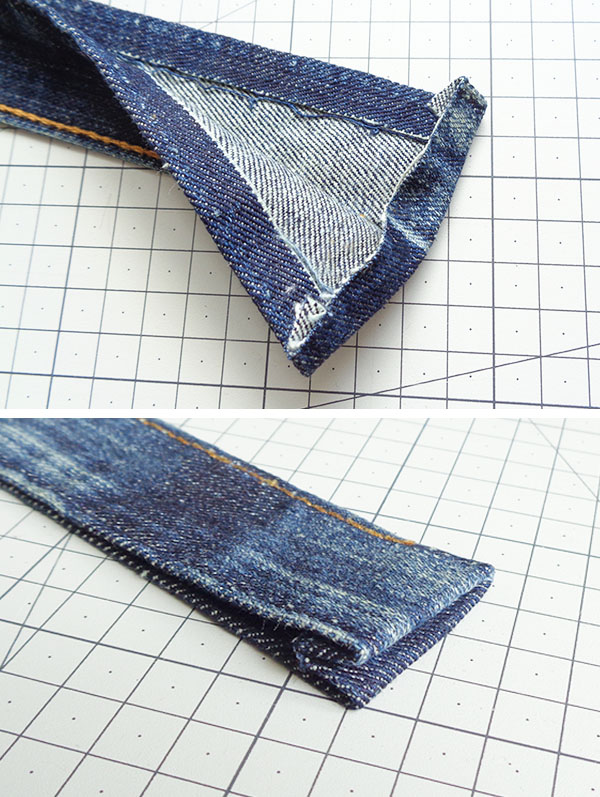
When you are happy with your design, unpick some stitching at the top at both ends of the bracelet. Remove stitches twice the length of your seam allowances. This will allow you to fold the seam allowances in. Fold in and press strong at both ends. You can clip them to keep in place.
A quick note about waist bands
You may wonder how to fold the waist band which was made from only one piece of denim. Here is an easy solution.
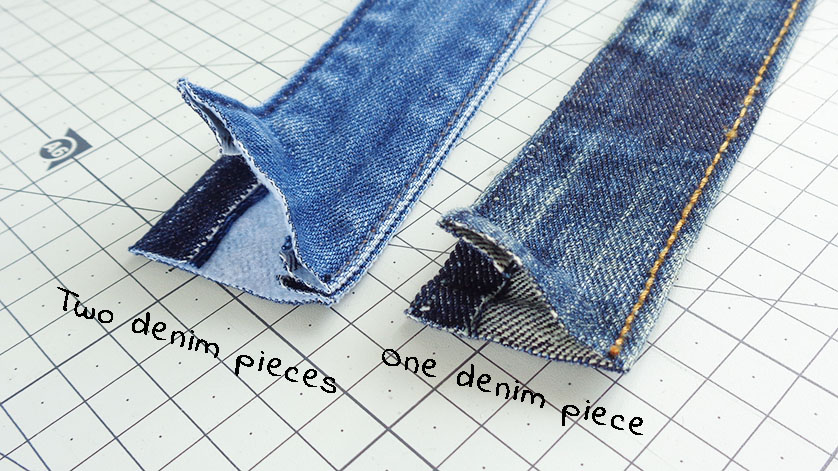
Undo the stitches, also twice the seam allowance, open the side up, fold inwards the seam allowance, then fold closed back into the shape and press.
Back to our denim cuff bracelet
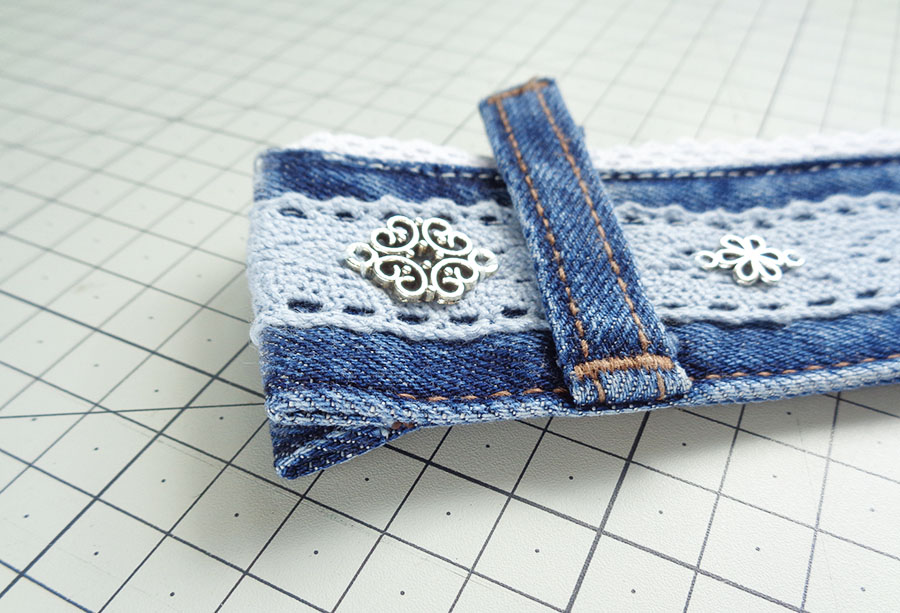
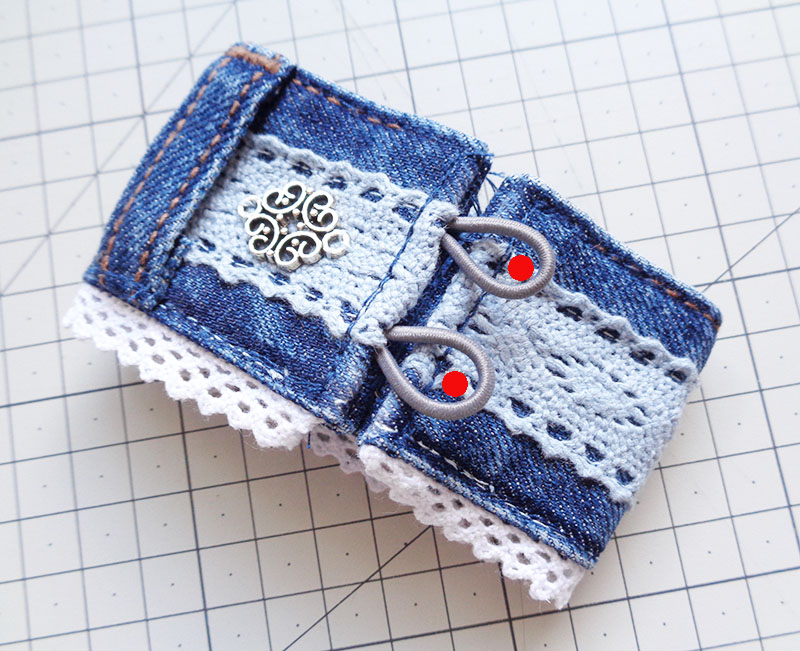
At one end we will insert the loops. Prepare two loops from elastic. For each cut about 7cm elastic band and fold in half. Secure them by wrapping some thread around. This will help a lot while inserting, elastic loops are small and fiddly, so the thread keeps them sturdier.
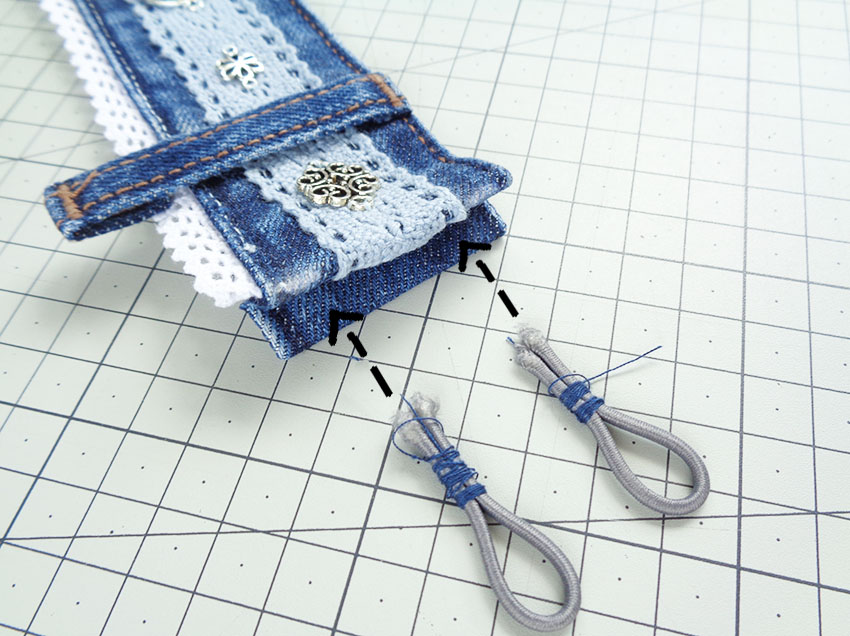
Insert the loops between the two layers of denim. Stitch this side up. You might prefer to do it by hand and use a thimble.
Then stitch up all the way around, starting at the top, around one side, then bottom and up and into the top of the other side. It is good if you stitch more than once at the loops side to secure the loops.
If you are using a belt loop, it’s time to stitch in on. Cut some off to make it fit the height of the bracelet when folded and stitch in place. Rotate machine wheel by hand and go slow.
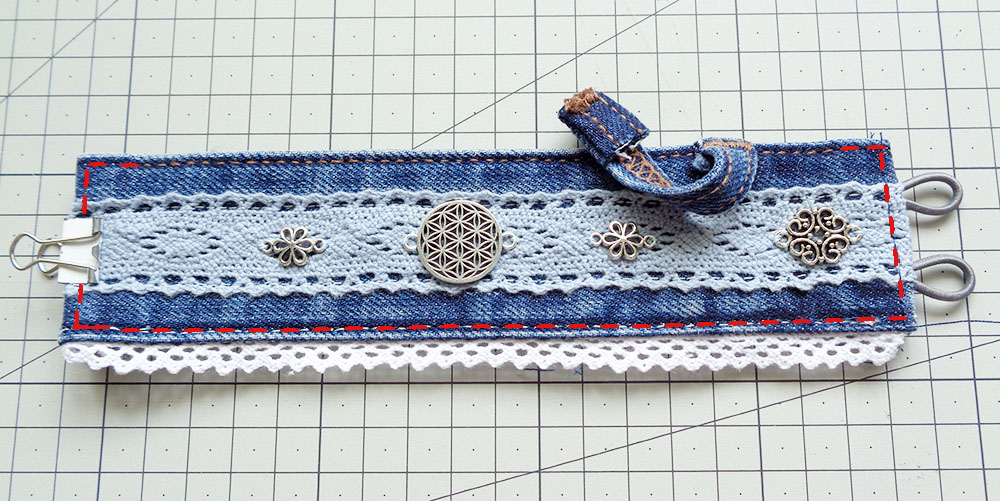
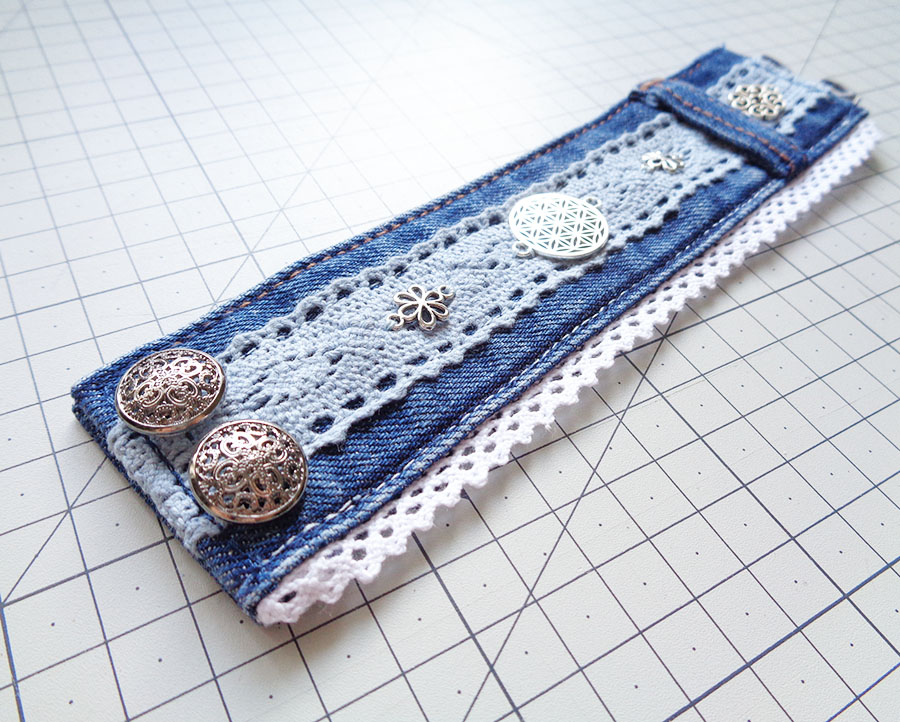
Nearly there! Just buttons to sew on. Fold the bracelet in such position where you can mark the places for buttons.
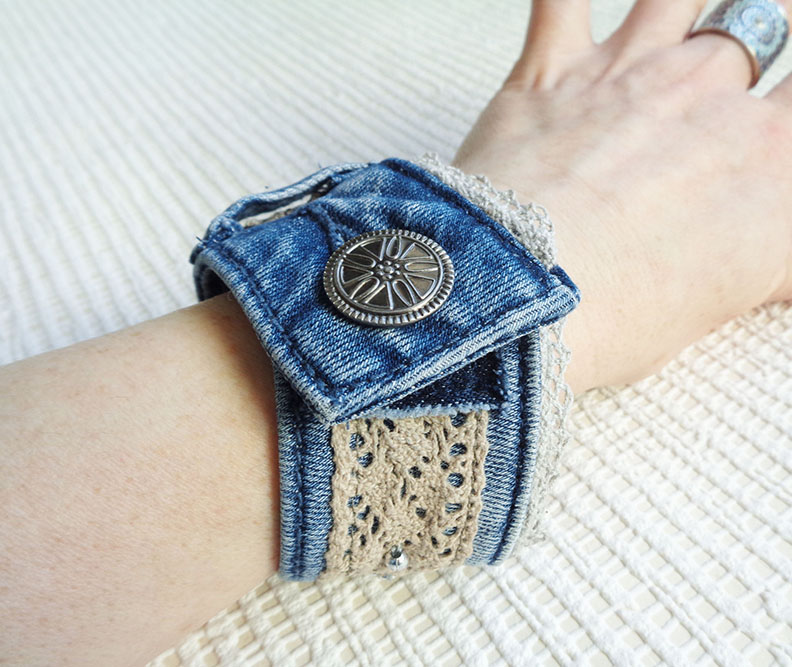
Choose a thread colour that is matching to the denim at the back and sew on the buttons. And you are done!
Cuff bracelet with original buttonhole
You have probably seen such a cuff bracelet before where the original jeans button or/and button hole are used. I don’t particularly like that option because once you put it on it gets lopsided. This is due to having only one point of fastening (not two as in above tutorial) and the bracelet swivels. Also, it’s rear to get a straight waist strip here, because next to the buttonhole it is usually curved.
But anyway, I will show you how to make a denim cuff bracelet with this type of fastener. This free sewing tutorial will be not so detailed, because it’s quite very similar the the bracelet above and I only will mention some differences. Keep referring to the first bracelet tutorial.
Making it
Usually there is a different type of stitching at the ends of a waist band and the easy method as in my video above will not work. So unpick the stitches with a seam ripper.
Roll the bracelet up or around your wrist and through the hole place a mark for the button.
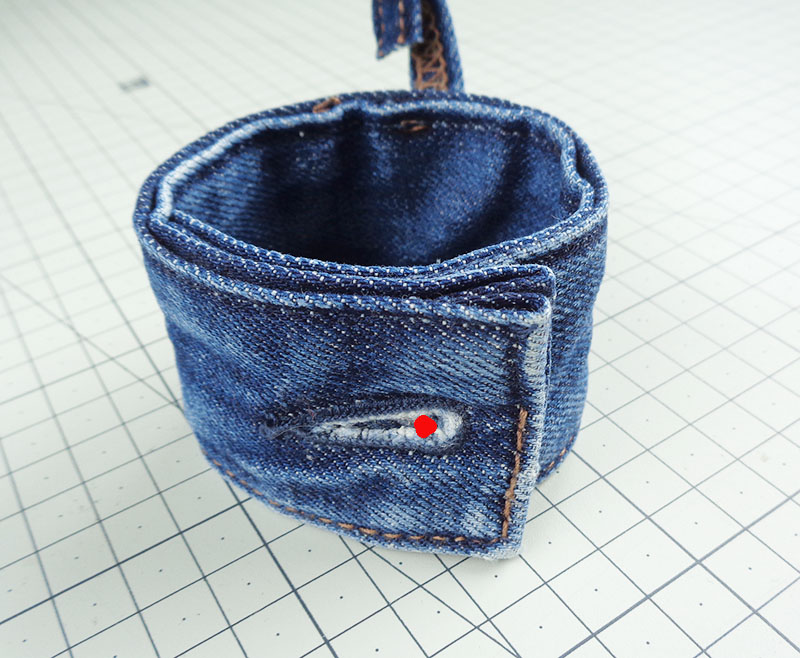
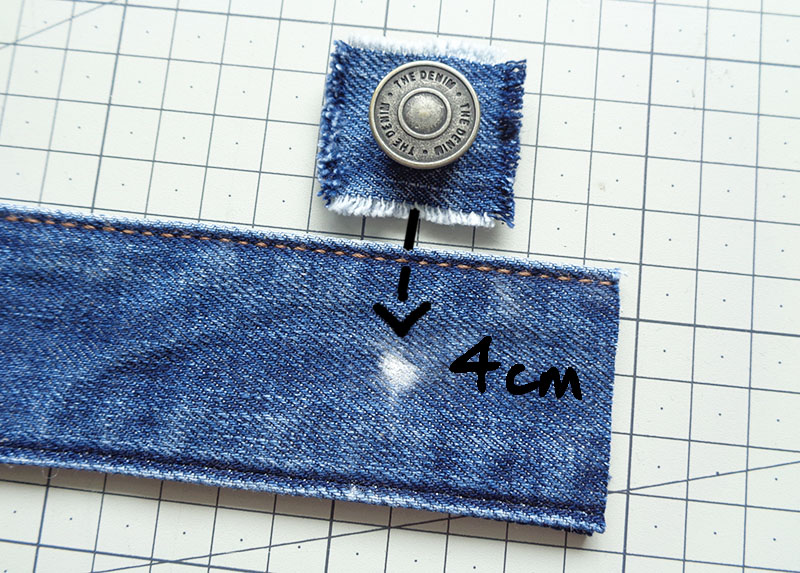
Unroll it and at the end where the button will be inserted, cut off the end from the mark – appx 3,5-4cm. This will be ok for the button and the seam allowance. To prepare the button – find a pretty button (it can be from another pair of old jeans) and cut it out keeping some denim around it enough to stitch. Fray the edges for a nice look.
Before you sew on the button, decide on your design. Because IF you are adding lace or ribbon, for instance, then it is a good idea to hide the end of the lace under the button fabric 😉 For the lace on the other end, you might wish to add a jeans belt loop to hide the other end. Or you can hide it under some other décor elements.

Sew on your lace/ribbon onto the front only. If you wish to add some lace to the bottom too, add it now, in the same manner as described for the bracelet above.
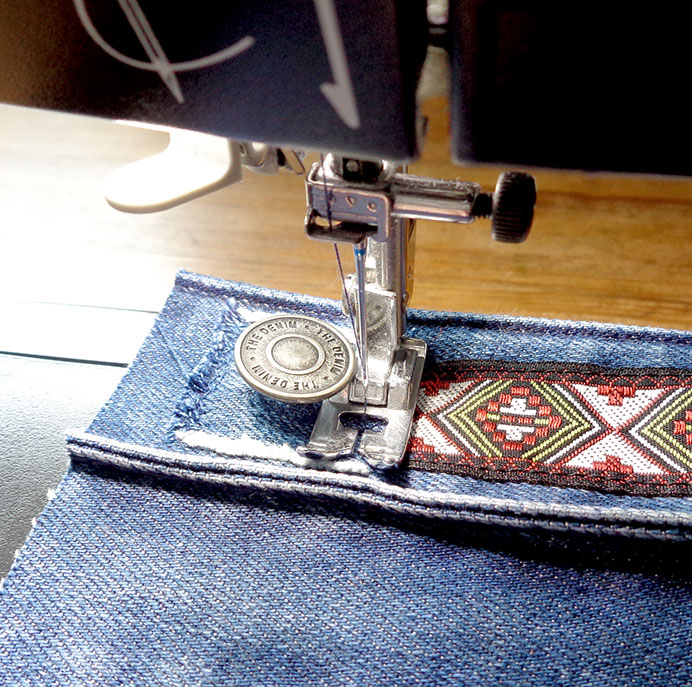
Now you can sew on all the design elements and the button too. Sew them onto the front layer only to avoid messy look at the back. When adding the button, I recommend to sew it on by hand first, right near it’s leg (to keep in place) and then using a sewing machine and a narrow zigzag, you can go around the square piece of fabric. You might be surprized but the machine foot can just about pass the button 😉 If there is any problems, stitch by hand.
Now all left to do is to sew around the whole bracelet. In the same manner as described for the first bracelet, unpick some stitches and fold in the seam allowance at the raw edge, press. Go all the way around slowly and if needed rotate the machine wheel by hand.
Then cut, fold and sew into place the belt loops if you are using them. Well done!
Bracelet with snaps
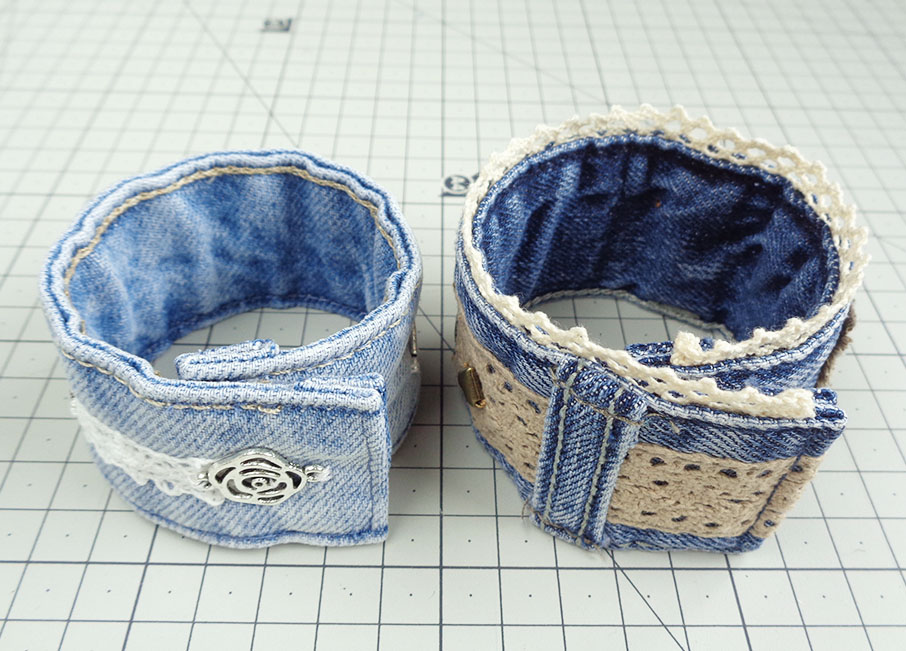
This is my least favourite way of making a denim bracelet. The overlap sticks out when I wear it due to the snaps and bulk at the edges. It also doesn’t leave me much freedom for sewing on décor elements. However, lets look at it.
This is very brief sewing instructions because pretty much everything is the same as for the bracelets above with just a couple of differences.
Measuring and marking
To measure for the placement of the snaps, wrap a tape measure around your wrist, make it loose. I usually add 3cm to my wrist, this will sit comfortably and because the bracelet is thick, once wrapped around it sits closer to the wrist than a measuring tape. This is your desired length.
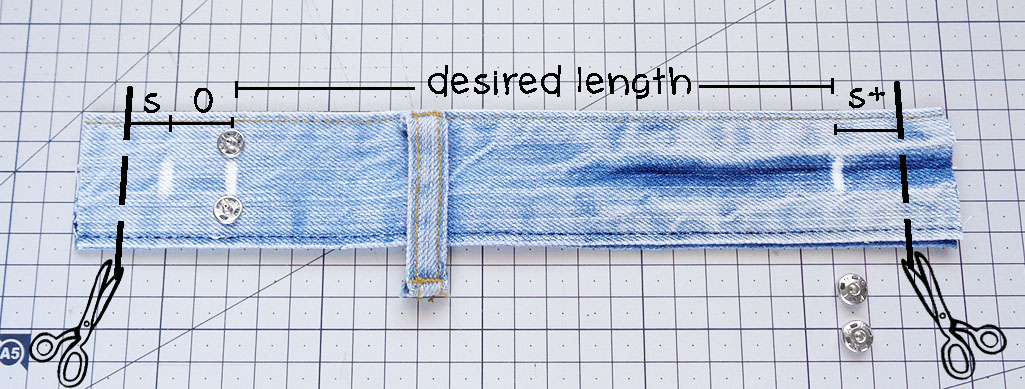
Take a piece of waist band that is minimum 8-10cm longer than the desired length. On the front side of it mark the desired length. This is where the snaps will be attached.
Then from the mark on your left go to to the left more and mark 2cm – for the overlap (O), then from O mark go to the left again and cut at the distance of 1,5cm – this is your seam allowance (S).
At the right side, from the mark go to the right and mark/cut 2,5cm (S+). This is your seam allowance + some extra to be able to stitch next to the snaps later. No overlap is needed at this side, because too much overlap will cause too much sticking out. So the back snaps should sit right next to the edge of the finished bracelet.
Transfer the mark for the other pair of snaps (at your right) onto the back side of the bracelet (by pocking a needle through). Mark this point at the back.
Sewing
Sew on the snaps. Two to the front and two to the back, as marked. Check the snaps before inserting, as it is easy to get confused which side goes where. Sew them to one layer of denim only, so that there is no mess visible on the other side.
Undo the stitches at the seam allowances at the top, just as with the first denim cuff bracelet and press them inwards. Don’t sew them yet. You can now put the bracelet on and see better of what décor and where it can be added, it is different due to overlap. Don’t add too much thickness to the overlap, it will stick out even without any additions.
Decorate your bracelet at the front layer only. Then, with all the seam allowances folded inward, sew all the way around the bracelet, just as with tutorials above. Be very careful sewing next to the back snaps as they sit very close to the edge.
Done!
I hope you have enjoyed this free sewing tutorial of denim cuff bracelet. Leave a comment below and check out other sewing projects that you can make using old jeans. More denim craft ideas are here >>>
Have you enjoyed this tutorial? Was it useful for you? If you are thinking how to thank me, you can buy me a coffee. This is how I keep this website adds-free!
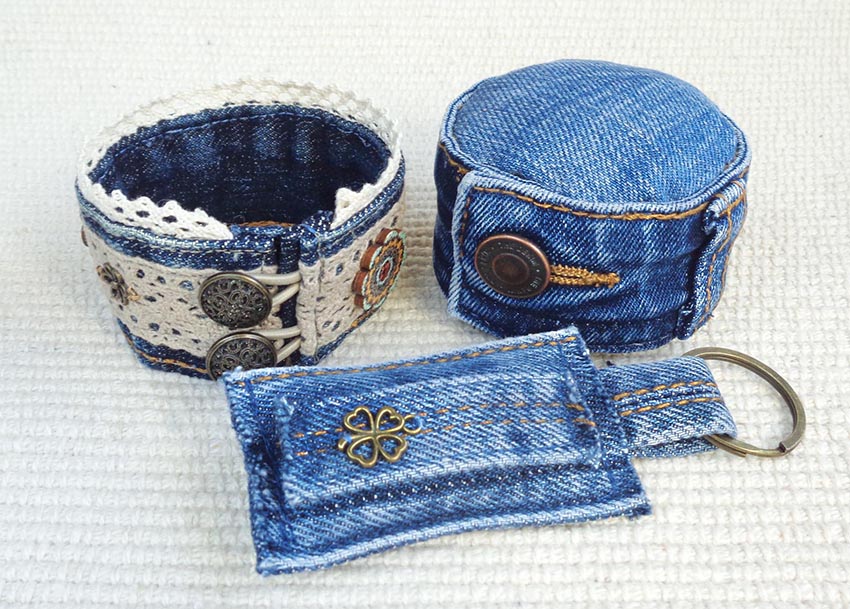
And with the left over waist band you can make some other cool stuff like a key chain or a pin cushion, which I have free tutorials for also.
Love them!
Thank you!
Hola, ¿Cómo estas?
Antes que nada comentarte que me encantan las pulseras y con este tutorial de tu trabajo, quede gratamente encantada, por tan original y creativa idea.
Todas están divinas, muchas gracias por compartirlo. Pronto trataré de hacerme…. quizás un par 😉 . Saludos desde la CdMx
Hello, Ivonne! Thank you for your nice message! Have fun creating the bracelet and greetings from Czech Republic 🙂
Awesome tutorial, thank you!!!
gorgeous beautifully done
Thank you for sharing
I was wondering about if you could maybe use magnets for closing.
Kathy
Sacramento, Ca
Hello, Kathy! Yes, you can use magnet snaps, but as I described in the article it seems too bulky to me.