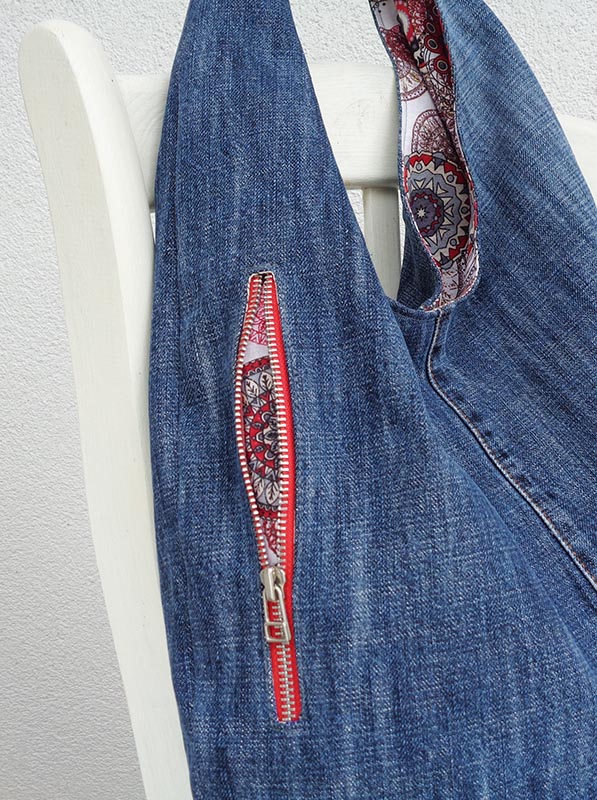
Metal zippers look so good with denim! Let’s see how we can use metal zipper pocket in denim bags. By understanding the way the zipper is inserted and how the insides of the pocket are made you will be able to fit a pocket into almost any bag! Use this method for inner pockets on the lining or outer pockets to add some character and decor.

There are loads of different zippers on market, but thinking the recycling way, a fly zipper from jeans can come handy as well for a small pocket for coins, cards, lip-balm, head-phones. Unfortunately it will be hard work unpicking the threads, because the zipper is sewn in to last forever :). But some zippers are so pretty that you can’t resist 😉
Planning the pocket
First of all decide where you are going to place the zipper. Keep in mind that it’s better to avoid all the bulky places, such as existing pockets and multi-layered seams.

For one pocket you will need two pieces of fabric big enough.

Cut out two shapes for one pocket. The two shapes for the pocket must be slightly wider then the zipper and fit within the bag’s body shape.

On one of the pocket pieces draw a rectangle 1,5cm high and wide enough to fit in it the zipper teeth AND the metal stoppers. (If you are using a 3mm plastic zipper for an internal pocket on a soft lining fabric, then the width of this rectangle could be smaller so that zipper stoppers are rather hidden at both sides).

Sewing the opening for the zipper
Place that pocket piece into the exact position on the bag, faces together, so that the drawing sits at the place for the zipper to be in.
Stitch the rectangle exactly as you’ve drawn it and cut along inside it. Do not cut right up to very ends, but make V notches at each side. Be careful not to cut the stitching. If you accidentally cut just a bit through, stitch all the way around again, slightly wider to hide the mistake 🙂

Push the pocket through the opening and push out the seams flat with your fingers first and then with an iron. It is good to iron on the wrong side to avoid iron streaks and to make sure that the lining is not visible in the opening for zipper.

Add the zipper
Position the zipper inside of the opening and secure in place by wonder tape or pins. Make sure the slider is visible in the opening and the metal stoppers are not in the top-stitching area.
Top-stitch around the opening. As you get to the zipper slider, leave needle down, lift up the presser foot and pull the slider past under the foot, out of the way to be able to proceed.

Looking good!

Add the rest of lining
From the wrong side add the other piece of the pocket lining facing together.

Pin the two pocket pieces together without touching the body panel. Stitch around the pocket pieces, moving the denim body out of the way as you go.

This is it! A handy pocket for anything you wish to stash in it. And it looks great adding some character to your denim bag 😉


Vertical zipper pocket

I am sure there are times when you wish you had a fancy metal zipper pocket in denim bag on the outer for an easy access to your mobile phone or keys. Sometimes it’ll rather be positioned vertically – for convenience and fancy detail. Easy done!

The same as with horizontal pocket, get enough fabric to make two pocket panels. Lay it onto the pre-cut bag’s panel, which is not sewn yet. Lay one pocket piece and a zipper into the position to the exact place you wish it to be. If you are making a pocket for your phone, make sure it will fit – pin down the ends of the zipper, open it and feed the phone through 🙂 Watch out here for not only the zipper length but the edge of the pocket-to-be on it’s opposite side – there must be enough space for the phone to get in.

Once you know the zipper is long enough for your phone to fit through, trim the fabric into a drop shape like on the picture below. You don’t need much on the top, but at the bottom – the more the better. There should be enough space for the phone and for the seam allowances. It is also good if you have the bottom line rather lower than the zipper’s bottom end – for a deeper pocket.

Once you are happy with the shape you have made – cut another piece like a mirror image. Just lay it on top of another piece of fabric facing together and cut around.

Pin one of the pieces right sides together with the bag’s body into the exact position, make sure it is the correct piece, remember they are mirror image ;). Draw a rectangle and proceed as described for the horizontal pocket.

Now you can finish off the whole bag:


Wax trick

If you have noticed that your metal zipper doesn’t run open-close smoothly, here is an easy trick which I have learned when was working at a diving centre. Divers have 100% waterproof suits for diving in cold water and there are heavy duty zips with metal teeth so big that it is hard to zip them up. We used to wax them every now and then for an easier slide.

So the trick is – rub a piece of white wax against the metal teeth until you see the white bits are left there. Run the slider closed and open a few times. Then, for a tidy look, slightly iron with or without a cloth to melt the wax. Run the slider open/closed again and you should notice it’s moving smoother.
I hope you have enjoyed this free sewing lesson on how to add a metal zipper pocket. For more tips and tricks for DIY denim bags visit the Lessons page >>>
For more denim projects visit the Tutorials page >>>


Hiya hun, omg I absolutely love ❤️ ur site, there’s so much to look at, learn from, tutorials & pdf’s to buy 😄. I’ve always wanted to learn how to add a pocket to any bag & this is exactly what I’ve been searching for 😃 the only criticism (sorry) is the quality of the pics – they are really bad to see 😞 or it might just be me, lol 😆. Bless ya for making this site hun xx
Thank you for the comment! I am so happy that you find it useful! I thought the pics are same throughout the site… Not sure what could it be. Hope you are enjoying it anyway 🙂
I would just like to say, you have been a life saver! My sewing teacher in Junior College was so mean about sewing a certain way, that she would put you out of her class, and tell you that it must be fixed before you can come back! I struggled with sewing zippers and button holes, then I got Carpal Tunnel in both hands, and I can’t sew like I would love to! Thank for this info…And it’s free!
Dawn B.
Thank you for the interesting story! I am glad you are enjoying my school 🙂
Thank you for this tutorial. I am up cycling old jeans
to bags and clothes.Pockets are so convenient and doable. Will practice today. I am in USA, Brooklyn.
Thank you, Doris! I am glad you are upcycling with me! 🙂