The front pockets of jeans are so lovely, they usually have so much character on such a small space, it’s almost impossible to throw it away! What can we DIY with it? Let’s make a zipped flat makeup bag! Makeup bag with front pocket made using old jeans free tutorial is here for you.
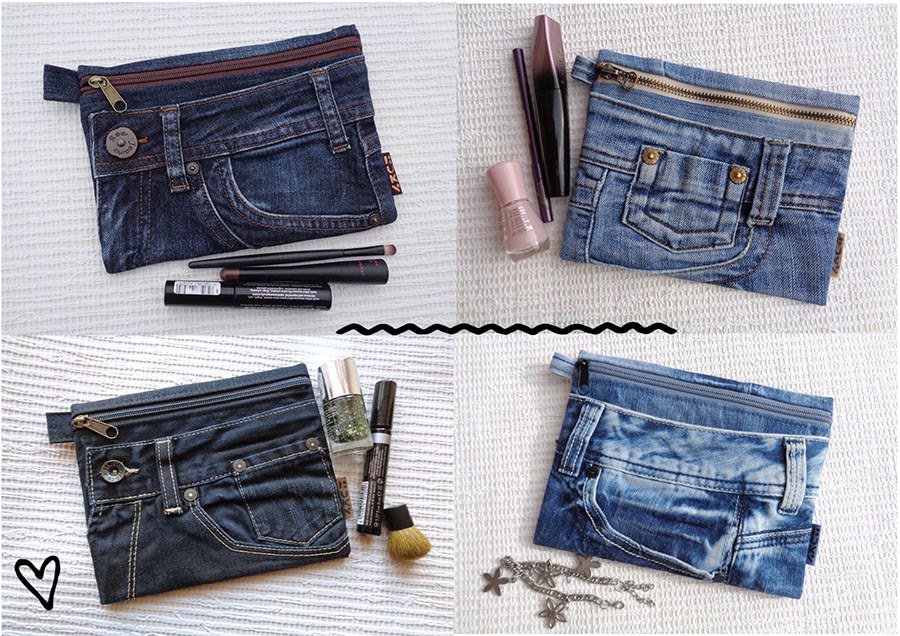
In this free step by step tutorial we will make a DIY denim makeup pouch using jeans’ front pocket. This is a great sewing project to recycle old jeans into a flat zipper pouch with lining.
Other designs using the same sewing process
Before we continue to finding the perfect jeans pocket for this make up bag, I would like to mention the other designs that are sewn in exactly the same way. This makeup pouch with lining can have other designs on. Such as patchwork (see details here >>>), strips of jeans’ seams, stamping (more here >>>) or a small pocket added (tips and tricks for pockets here >>>).

Finding the right jeans
To make this flat makeup bag you’d need some rather small jeans where the décor elements (waist band, pockets) are small. Another important thing is for them to be soft, because too stiff denim will be hard to work with on this small item.

The shape and the principal of inserting the zipper is exactly the same as in this sewing lesson for a key pouch. The only difference really – is the size and the added lining.
The pattern for this flat makeup bag with zipper is a rectangle. Funny that, the A4 sheet of paper is the perfect size! However, the “keeping the jeans pocket” aim of this sewing project might be a bit challenging and requires individual approach to each jeans. Due to so many variants and sizes of the jeans coin pockets, you might have to change the size of the pattern rectangle, you will have to judge as you go. Kid’s jeans will come handy here.
However, remember, that there is always an option to make a pouch without that front pocket (as mentioned above) and in this case you don’t have to use the A4 size, you can make it smaller, for instance 25x17cm, or even 21x16cm.
To play it safe for your first attempt, stick to my A4 Pattern and measurements provided in this article and experiment later. Click and download the A4 Pattern below and print it:

Small jeans work best
The most important thing to consider while finding the right jeans – is the distance from top of the waist band down to the lower edge of the pocket – arrow B.

As you can imagine, this whole pocket design has to fit into the front of a small makeup bag. If you are using A4 paper as your pattern (don’t forget the added seam allowance later), the red arrow distance (B) must be 11cm (4,5″) or less. I’d mention right now – it’s the smaller jeans or smaller pockets work best with this pouch.
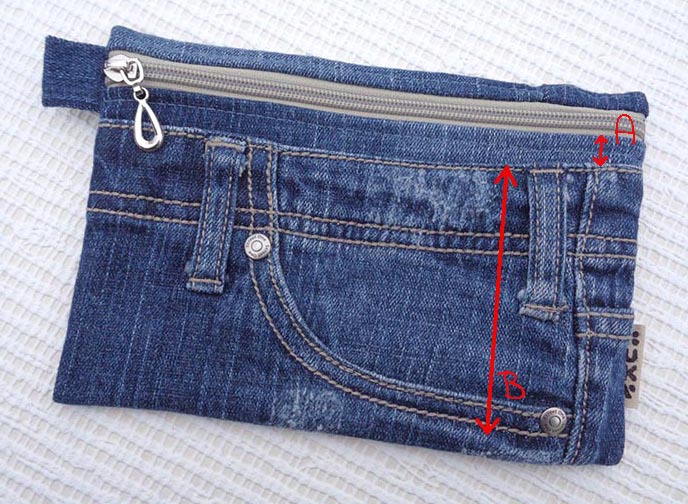
The measurement for the arrow A should be minimum of 2cm (3/4″). This added piece will give you some freedom to cut to the right size, but if you can keep it to a minimum – the pouch will look best.
If you want to make it slightly larger, for instance the distance A is 12cm on your jeans, then the whole pattern rectangle will be 33cm (13″) tall and 22cm (8,5″) across. Add seam allowance to that.
Once you can see that the pocket fits within the required distance – gather other things needed for this makeup bag.
What you’ll need
Except the right jeans you will need a zipper and some fabric for lining. You will also might decide to add a tab, which is easily made from a belt-loop of the same pair of jeans you are working on. Different options for side tabs are explained here >>>. Be aware though that adding it might create so much bulk at the side of the pouch that your sewing matching might struggle to go over it.
The length of the zipper should be minimum of 26cm (10″), a bit longer is even better. The size of the zipper – I use #5 here, comparing to the little handy pouches where I use #3 zipper.
For the lining I always use cotton. It’s eco-friendly, easy to work with and it comes in so many pretty prints! You will need exactly the same size piece as the denim body – A4 in our case.

Preparing the denim body
By putting on and off the A4 Paper Pattern onto the denim piece, decide where exactly it is going to be. The drawing on the paper pattern is to give you an idea of where about the pocket should be situated. It is approximate but very useful.
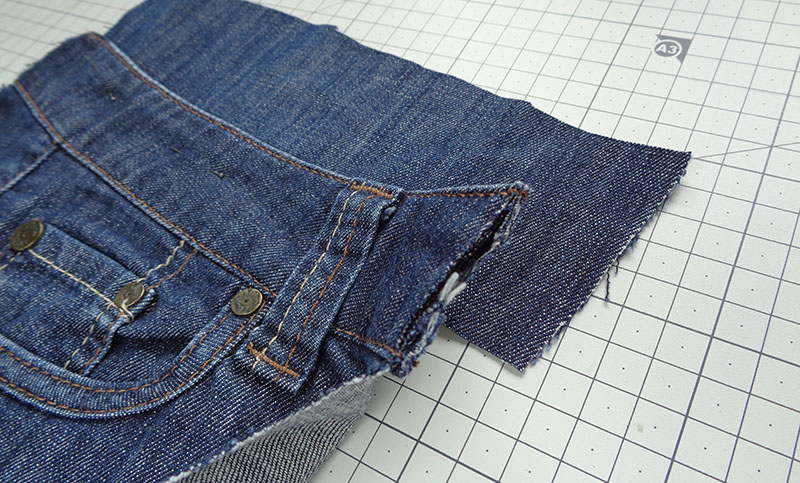
From the bottom or another part of the jeans cut a rectangle of a size MINIMUM 23cm (9″) by 5cm (2″) – this piece will be added above the waist line for the zipper to be sewn onto later.

Sew the additional piece under the waist band, making sure it looks nice and tidy and preferably is matching the grain lines of the rest of the pouch. Sew along the top waist line with a matching thread for a tidy look.
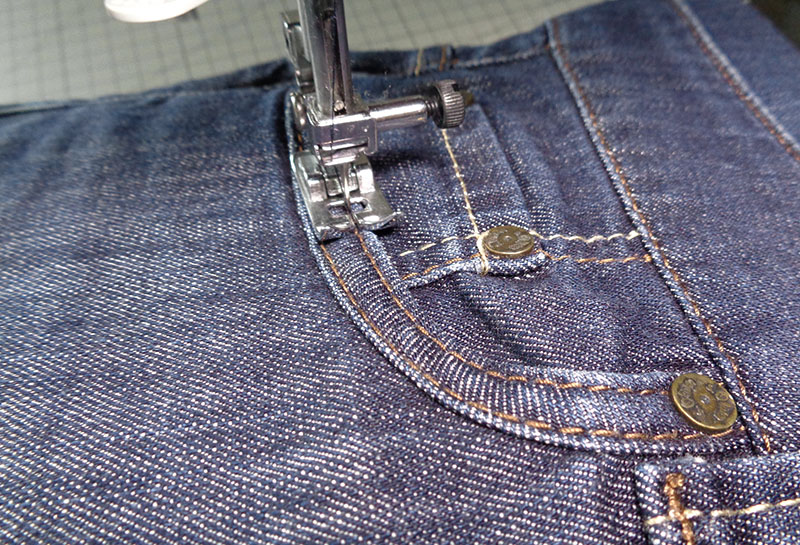
Stitch up the pocket closed. Unfortunately, the size of the pouch doesn’t allow us to keep the pocket functional 🙁 It is going to be decorational only.
Cut off all what’s possible at the back – to make less bulk.

Put the paper pattern on top of your denim piece to find the exact position.

Consider leaving minimum of 2cm (3/4″) of fabric above the waist line!!! 1cm is to enable you to sew the zipper in and another 1cm is your seam allowance.
Cut out the denim piece (adding seam alowances at all sides). Cut out the lining piece of the exact same size for this flat makeup bag.
Sewing the zipper
Put the lining onto the denim body WRONG sides together and pin at the top (narrow side) where the zipper will be attached.
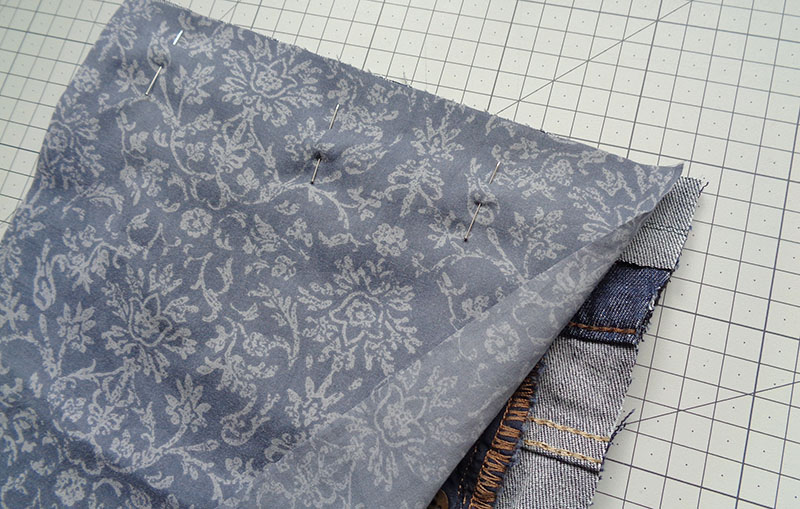
Turn over facing towards you and place the zipper on top of the body right sides together starting from your left with the zipper’s open side. Pin in a few places.

Make one seam along the zipper. When I sew 5mm zippers I prefer to use the zipper foot for the machine. It stops the foot jumping off the track.


Cut off some fabric next to the zipper, but not the zipper itself. Only 2-3 mm. When we go over the zipper for top-stitching, this trimming step will make the raw edge hidden under the zipper completely and therefore — the tidy look of the lining inside.

Fold the zipper to the right position as on the picture above and sew along with a nice straight stitch leaving about 0,75-1cm from the zipper teeth.
I put my standard machine foot right next to the zipper teeth and it usually gives me the right distance.

Zip the zipper up nearly full. Fold the body in half bringing the other side up to the zipper, level it all up with the zipper edge and at the sides and pin.

Sew, trim, refold and sew again — in exactly the same manner as the first zipper half.
Finishing the sides
Turn to the right side and flatten the pouch like this. Make sure the zipper and the jeans pocket fits in the front! If they do, you can proceed.

Turn again inside out.
Watch out how you are flattening the pouch now!
It will look the same, but if you don’t fold it correctly now, it will come out completely wrong! If you have had the zipper from left to right, it will now be opposite. On the inside – have a peek – the pocket and the zipper should be at the same front side.

It is good to have a couple of millimetres left at the very top too. This just helps to keep the flat shape a bit better.
The tab is not necessary, but it’s a great little addition to the denim look. However, to add it to your pouch you must be aware that there is so many layers of fabric gathered that not every sewing machine will handle it.
Now stitch the sides in straight lines leaving some seam allowance (1cm for instance). Then zigzag stitch (or overlock) both edges and trim off the loose threads to make it tidy.

Done!
Turn your flat makeup bag back to the right side and push out the corners and sides. Flatten and iron with steam but through a thin cloth.


Variations
The front pocket of old jeans can be used not only to DIY this zipped makeup bag. How about a wallet with a wrist strap? Or how about using the front button in the design as well? Some buttons are adorable and worth using in your denim project too.


The flat zipped pouch with lining can be made in many different designs and sizes.


I hope you have enjoyed making this makeup bag with front pocket using old jeans. Feel free to leave a comment below 🙂 Check out more stuff to make with old jeans here >>>
Zipper pouches like this of different sizes make great gifts. Take a look at more gift ideas to DIY:

j aimerais bien comprendre en français merci d avance cordialement
Hello! You can translate the page by google translate 🙂
Thank you so much! I really enjoyed making this make -up bag , very easy instructions..
Thank you for the feedback! I am very happy that you have enjoyed it. Do you you have a photo? I could put it into the Student’s Gallery. Drop me an e-mail 🙂
Love this Bag. Instructions are Great, but I’m a Visual person. Do you have a Video Tutorial on how you did this jean bag?
Thank you, Cecilia, for the nice words 🙂 Unfortunately I don’t have a video for this tutorial, I am not very good with making videos…
Really super cute—I’ve made 3 already! Where do you get the awesome zippers?
Hi, Renee, I am glad you liked the idea! I buy zippers per meter and the zipper heads separately.